Tips for Enhanced Privacy and Online Security
Ever wondered how much of your online activity Google tracks? From tracking your favorite brunch spots to logging every symptom you've been curious about, Google keeps a comprehensive record of your digital footprint. It's like a diary you never intended to create, storing personal details going back as far as 2005.
But did you know that you can erase this history entirely? Doing so can help protect your online privacy, minimize targeted advertising, and prevent sensitive queries from lingering in your account. This guide will show you how to take control of your Google search history permanently, with insights tailored for VPN users who are already taking steps to enhance their digital privacy.
Privacy First: If you're using Google apps in a professional setting (such as G Suite), check your organization's policies before making changes to shared accounts.

What Kind of Data Does Google Track?
Google gathers an extensive amount of data through its various services. By understanding what is stored, you can make better decisions about safeguarding your online presence. Here's a snapshot of the types of information collected within your Google account:
- Search Activity: Google records every query to deliver faster, personalized results.
- Browsing History (via Chrome): Tracks visited websites for tailored suggestions and improved speed.
- YouTube Watch History: Logs every video you’ve searched for or viewed to customize recommendations.
- Location History: Whether through Google Maps or other services, your movements are tracked to enhance location-based suggestions.
- App Interactions: Information about how you use apps linked to Google is stored to optimize your experience.
- Voice Data: Voice commands used in Google services are saved to improve recognition accuracy.
- Purchases and Reservations: Gmail integrations track information about purchases or bookings for easier management.
With this data in mind, deleting your history ensures that these details no longer linger, reducing what can be leveraged by advertisers, third parties, or even bad actors in case of a breach.
Protect Your Privacy with Falcon VPN
As you're considering deleting your Google search history to boost your privacy, it's important to enhance your protection further with a VPN. Falcon VPN can help you stay anonymous online by encrypting your internet connection and masking your IP address. This means even if someone tries to track your activity, they won’t be able to tie it back to your real identity.
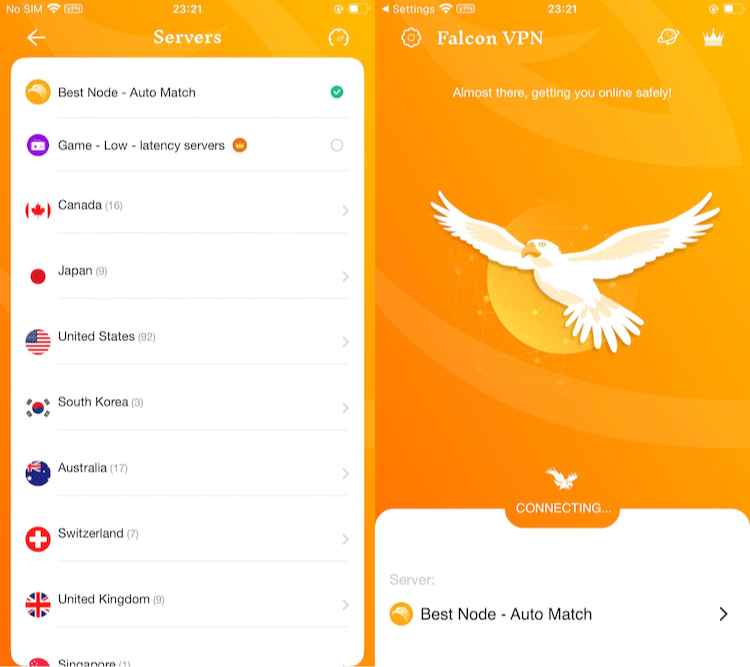
- Get the VPN App
Head over to FalconVPN and download the appropriate version for your device. - Complete Installation
Open the downloaded file and follow the prompts to install the free VPN app on your device. - Open the VPN App
Launch the app after installation. Select your preferred server location. - Connect to Secure Your Internet
Hit the “Connect” button to encrypt your connection and protect your online activities.
Why Should VPN Users Prioritize Managing Google History?
For VPN users already committed to protecting their anonymity online, deleting Google’s stored data is a natural next step. Here’s why this is essential:
- Enhance Privacy Protections
Google builds a profile based on your search queries, habits, and preferences, raising concerns about how much is tracked. By eliminating this data, you minimize the amount of activity that's retained, adding another layer of privacy alongside your VPN.
- Limit Targeted Ads
If you’ve noticed ads following you online after searching for a product, that’s the result of Google using your behavior. Removing history helps disrupt this tracking, making your VPN’s effort to anonymize your activity even more effective.
- Avoid Sensitive Info Exposure
From medical concerns to financial queries, your search history might hold private information you wouldn’t want someone else accessing. Deleting it ensures a clean slate, especially if sharing devices.
Balancing Benefits and Risks of Retaining Google History
For tech-savvy users, there’s a debate about whether keeping Google search history is worth it. Here's a breakdown of the advantages and downsides:
Benefits of Retention
- Personalized Experience: Tailors search results and recommendations.
- Convenience: Access previously visited sites or quickly repeat searches for efficiency.
- Better Suggestions: Platforms like YouTube or Google Maps offer improved recommendations based on past activity.
Risks of Retention
- Privacy Concerns: Detailed personal data, if breached or accessed, could reveal information you'd rather keep private.
- Targeted Ads: Sophisticated profiling techniques are used to deliver ads, which can feel invasive.
- Data Exploitation: Stored information risks misuse or theft, such as private searches being exposed in a breach.
How to Download Google Data (Before Deleting It)
Keep in mind that some users may want a personal copy of their search history or related data. Google’s Takeout tool allows you to download and export data stored across platforms. Here’s how to retrieve it securely before wiping your account clear:
- Visit Google Takeout and select the data types (e.g., Chrome, Search, YouTube) you want to download.
- Choose export preferences, such as delivery method (email or direct upload to cloud storage) and file format.
- Follow emailed instructions once the export is complete to access your archive securely.
Important: Protect this file with encryption or secure storage methods, as it often contains private details.
How to Remove Your Google Search and Browsing History Across All Platforms
If you’re concerned about privacy or simply want to clean up your digital trail, knowing how to delete your Google search and browsing history is essential. From erasing searches and video searches to clearing ad activity, here’s how you can maintain better control of your data using various devices and methods.
Deleting Google History with My Activity
Google’s My Activity tool allows you to clear your search history across all linked devices. Here’s how to do it:
- Visit Google My Activity and sign in to your Google account.
- Click the three dots near the "Search your Activity" bar, then choose Delete activity by from the drop-down menu.
- A menu will appear; select your preferred time frame—Last hour, Last day, Always, or a custom date range. To erase all activity, choose Always.
- Select the specific Google products you want to clear (e.g., Search) or leave all products selected to clear everything. Click Next.
- Confirm by clicking Delete.
Erasing Search History on a Desktop
Follow these steps to manually clear all history directly from your desktop browser:
- Open your preferred browser and visit Google My Activity.
- Sign in to your Google account.
- Use the Filter by date & product option to narrow the data by date range or product type.
- Tick the box for "Search" under products and apply your filters.
- Select Delete, then confirm to erase your search data.
Clearing Google History on Android Devices
To delete your history from an Android device, use the Google app:
- Launch the Google app and tap your profile icon in the top-right corner.
- Navigate to Search history.
- Tap Delete, then choose a time frame:
- All time clears your entire search history.
- Other options include the Last hour, Last day, or a custom range.
4. Confirm by tapping Delete and then Got it.
You can also visit Google My Activity in your mobile browser and follow the steps above.
Clearing Search History on iOS Devices
To remove your search history using the Google app on iPhone or iPad:
- Open the Google app and tap the profile icon in the top-right corner.
- Select Privacy and security.
- Click Delete browsing data, then choose Time range.
- Select one of the time range options (e.g., All time or a custom range).
- Tap Delete browsing data and confirm your choice.
Alternatively, you can use Google My Activity through Safari or Chrome to access and manage your history.
Deleting Specific Items from Your Browser History
If you want to clean up only certain entries instead of your entire history, follow these steps:
- Open your Chrome browser and click the three vertical dots (⋮) in the upper-right corner.
- Hover over History, then click on History in the submenu or use the shortcut Ctrl + H (Windows) or Cmd + Y (Mac).
- Browse or search for specific items to delete.
- Click the three dots next to an entry and choose Remove from history. To delete multiple items, select their boxes and click Delete at the top.
For certain versions, you can simply click the “X” next to the entry to remove it.
Managing Google’s History Saving Settings
If you’d like to prevent Google from saving your search history moving forward, you can adjust your activity settings.
Turn Off Web and App Activity
- Visit My Google Activity and sign in to your account.
- Click Web & App Activity at the top of the page.
- Select Turn off, and follow the prompts to either stop or delete existing activity.
Enable Auto-Delete Options
Set up auto-delete to regularly clear your search history:
- Navigate to your Google Account by clicking your profile picture and selecting Manage account.
- Go to Data & privacy, then select Web & App Activity.
- Click Auto-delete, and choose a time frame (e.g., 3, 18, or 36 months).
- Confirm your choice by clicking Next, then follow the prompts.
Clearing Browser-Specific Search History
Even after removing Google activity, your browser may still store your browsing history. Here’s how to clear it:
For Safari (Mac)
- Open Safari and click History in the taskbar.
- Choose Clear History at the bottom of the menu.
- Select All time to erase all data, then click Clear History.
For Safari (iPhone/iPad)
- Open Settings and scroll to Safari.
- Tap Clear History and Website Data.
- Confirm by selecting Clear History and Data.
For Chrome
- Open Chrome and click the three dots (⋮) in the top-right corner.
- Go to Settings, then Privacy and security.
- Select Clear browsing data and choose All time under Time range.
- Check the Browsing history box and confirm by clicking Clear data.
For Firefox
- Open History in the taskbar and click Clear Recent History.
- Choose Everything under Time range to clear, then select the relevant data to delete.
- Click Clear Now.
For Microsoft Edge
- Open Edge and go to Settings.
- Navigate to Privacy, Search, and Services.
- Under Clear browsing data, choose All time and confirm.
How to delete your YouTube watch history
Your YouTube watch history may also store sensitive information. Here’s how to erase it:
On the YouTube App
- Launch the YouTube app and go to Settings.
- Tap History & privacy, then select Clear watch history.
On the YouTube Website
- Sign in and go to the History section.
- On the right, click Clear all watch history, then confirm.
To remove individual videos instead, hover over the video in the History tab and click the X beside it.
Advanced Tips to Strengthen Your Online Privacy
Deleting your Google search history is a great starting point to safeguard your online privacy. However, while it’s a useful step, there are additional measures you can take to further protect your data and prevent unauthorized tracking.
Browse Privately with Incognito Mode
Using your browser’s incognito or private mode helps protect your local browsing history. This feature ensures that no cookies, browsing history, or form data are stored on your device during a browsing session. Although it doesn’t prevent websites, internet service providers (ISPs), or search engines like Google from tracking your online activity, it’s excellent for maintaining local privacy—like when using shared devices.
How to Enable Private Browsing in Popular Browsers
- Chrome: Click the three-dot menu (⋮) in the top right corner and select “New Incognito Window.”
- Safari: Navigate to File > New Private Window.
- Firefox: Click the three-bar menu (≡) and select “New Private Window.”
- Edge: Click the three-dot menu (…) and choose “New InPrivate Window.”
For enhanced privacy, you might also consider switching to more secure browsers, such as Firefox or Brave. These browsers come with built-in features like tracker blockers and privacy shields, making them less reliant on ad-driven revenue models compared to Chrome.
Pair Incognito Mode with a Secure Search Engine
While browsing in private mode stops local data collection, it is equally important to use a search engine that respects your privacy. Platforms like DuckDuckGo prioritize user anonymity by refraining from tracking or storing your searches, providing a safer alternative to Google.
Take Privacy to the Next Level with a VPN
One of the most effective ways to protect both your data and your identity online is by using a Virtual Private Network (VPN). A VPN masks your IP address, encrypts your internet connection, and ensures that your web activity remains private. Here’s how:
- IP Masking: By hiding your real IP address, a VPN makes it difficult for websites to determine your location or identify you based on your digital footprint.
- Encrypted Traffic: All data passing through a VPN is encrypted, making it inaccessible not only to hackers but also to your ISP. This is particularly crucial when accessing sensitive platforms, such as online banking or confidential work tools.
- Protection on Public Wi-Fi: Public networks are notorious for being hotspots for cybercrime. VPNs protect your data from being intercepted by encrypting your connection, shielding you from opportunistic hackers.
- Enhanced Security for Home Networks: Even on private networks, your ISP tracks your data usage. A VPN keeps your online activities private from service providers and government agencies.
Falcon VPN, for instance, is a trusted provider offering features like military-grade encryption, high-speed servers, and secure access to geo-blocked content.
Clear Your Google Maps Activity for More Privacy
Your search history isn’t the only data Google collects. Your Google Maps activity contains information about the places you’ve visited or searched for—data that could affect your privacy, especially when using shared accounts.
Steps to Clear Your Google Maps Activity
On Your Desktop:
- Open Google Maps and sign in.
- Click the menu icon (☰) and select “Maps Activity.”
- Delete entries individually or use the “Delete” button to clear data for a selected date range or all time.
On Your Mobile Device:
- Launch the Google Maps app and sign in.
- Tap your profile picture, then select “Your data in Maps.”
- Under “Web & App Activity,” tap “See & delete activity.”
- Delete individual items or tap “Delete” at the top to clear items by date range or all-time data.
The Trade-Off Between Privacy and Personalization
While deleting and disabling your Google search history enhances privacy, it also impacts your browsing experience. Google relies on your search history to personalize your search results, elevating frequently visited sites to the top of your results. By removing this history, you may experience more generic and less tailored search outcomes.
However, this can also help avoid the “filter bubble” effect, where algorithms prioritize showing limited viewpoints based on past activities. Disabling search history prevents data collection entirely, offering a less personalized yet considerably more private experience. Balancing privacy with personalization depends on your preferences and browsing needs.
Stay in Control of Your Data
Protecting your privacy online is an ongoing process that goes beyond deleting your search history. By combining tools like incognito mode, privacy-focused browsers, VPNs, and secure search engines, you can significantly reduce the amount of information collected about you. For critical privacy needs—whether on public Wi-Fi or at home—a VPN is one of the most impactful tools available. Services like Falcon VPN make this process easy and secure, ensuring your data is protected at all times.
Take control of your digital footprint and browse with confidence!

Albert Ivan, writer by day, popper by night, is the former senior editor at iTop VPN. He Joined Falcon VPN in 2022 and has since written extensively on the topic of tech, digital privacy & security and internet freedom.