Navigating the complexities of your Mac's network settings can seem daunting, but disabling IPv6 is a straightforward process that can enhance your network's performance and security. With the evolution of internet protocols, IPv6 has become prevalent; however, certain scenarios may necessitate its deactivation. This guide is going to show you how to disable IPv6 on macOS, whether you prefer a quick system preference tweak or the granular control of terminal commands. From understanding IPv6's role in your Mac's connectivity to executing precise instructions, we'll cover all the bases to ensure your networking needs are met with ease and efficiency.
What Is IPv6?
IPv6, or Internet Protocol version 6, is the most recent version of the Internet Protocol (IP), which is the set of rules governing the format of data sent via the Internet or local network. It was developed by the Internet Engineering Task Force (IETF) to deal with the long-anticipated problem of IPv4 address exhaustion. IPv6 was designed to replace IPv4, which is running out of available addresses due to the rapid growth of the internet.
How to Disable IPv6 on Mac
Here are 2 methods:
Method 1: Turn off IPv6 on Mac via System Preference
1. Go to Apple Menu > System Preferences.
2. Click on the "Network" icon.
3. Select the network interface you are using (e.g., Wi-Fi or Ethernet).
4. Click on the "Advanced" button.
5. Go to the "TCP/IP" tab.
6. Next to "Configure IPv6," select "Off".
7. Click "OK" and then "Apply" to save the changes.
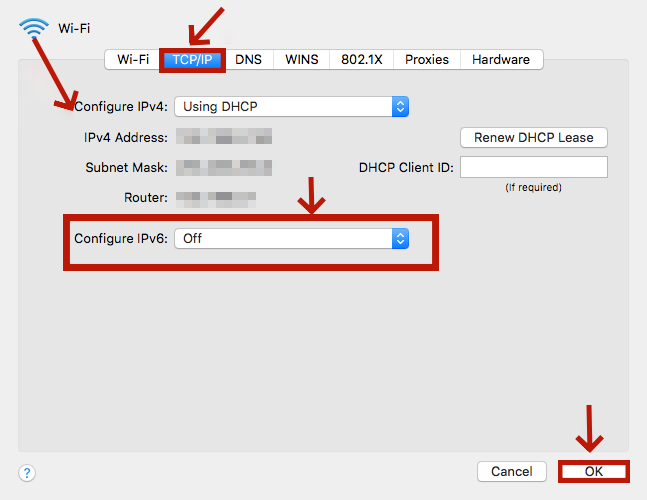
If you happen to use macOS Ventura or macOS Monterey, there is a mininal difference. You can take the follow steps:
1. Click Apple icon > System Sittings.
2. Enter TCP/IP into the search bar, then click on "TCP/IP".
3. Next to "Configure IPv6," select "Link-Local Only".
4. Click "OK" and then "Apply" to save the changes.
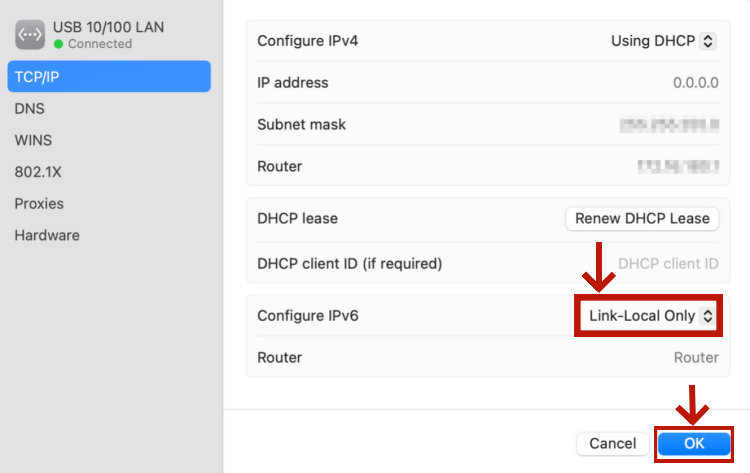
Method 2: Disable IPv6 on macOS Using Terminal
Another way to disable IPv6 on your macOS device is to use the terminal, which is a command-line interface that allows you to execute various commands on your system. To do this, follow these steps:
1. Open the Terminal app, which you can find in the Applications > Utilities folder, or by using the Spotlight search.
2. Type the following command and press Enter: networksetup -listallnetworkservices. This will show you a list of all the network services on your device such as Wi-Fi, Ethernet, Bluetooth, Thunderbolt, etc.
3. Type the following command and press Enter: networksetup -setv6off [network service], where [network service] is the name of the network service that you copied in the previous step. For example, if you want to disable IPv6 for your Wi-Fi connection, type: networksetup -setv6off Wi-Fi.
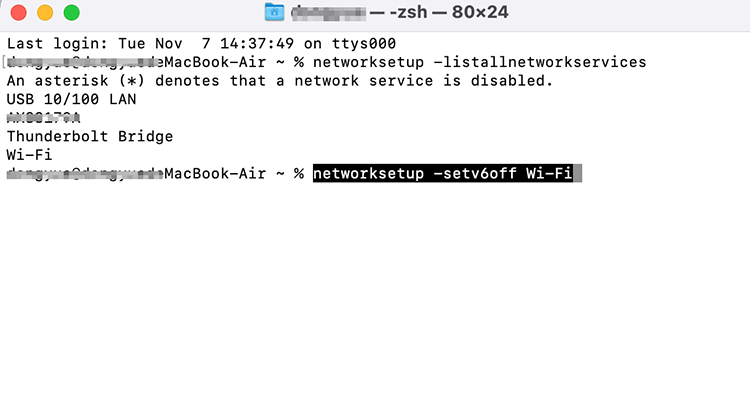
4. You will be asked to enter your administrator password. Type it and press Enter.
5. You have successfully disabled IPv6 for the selected network service.
How do I know If my Mac is still turning on IPv6 or not?
To verify, you can type the following command and press Enter: networksetup -getinfo [network service], where [network service] is the name of the network service that you disabled IPv6 for. You should see that the IPv6 address is set to “none”.
How to re-enable IPv6 if you change your mind
After completing these steps, IPv6 should be disabled on your Mac. If you need to re-enable IPv6, you can follow the same steps and choose "Automatically" or "Manually" from the drop-down menu to configure IPv6 addressed or use the execute command in Terminal below:
networksetup -setv6automatic [network service]
For example:
networksetup -setv6automatic Wi-Fi
networksetup -setv6automatic Ethernet
Why Do You Want to Disable IPv6 on Mac?
Technically, IPv6 offers several advantages over IPv4 such as more efficient routing, better security and support for new technologies. However, not all devices and networks are compatible with IPv6, and some users may experience problems when using it. Here are some key reasons you may want to disable IPv6 on macOS:
- Solve compatibility issues. Using IPv6 may lead to some issues like slow network performance, connection errors or security risks, due to misconfigured routers, firewalls, or DNS servers, or outdated software or hardware. Disabling IPv6 can be a way to solve these problems by forcing your device to use only IPv4, which is more widely supported and stable.
- Simplify the network configuration and troubleshooting. IPv6 has a more complex address format and structure than IPv4, and it requires additional transition mechanisms or tunneling protocols to work with IPv4 networks. That way, disabling IPv6 can make your network settings and diagnostics easier and faster.
- Security and privacy concerns. While IPv6 inherently includes features that enhance privacy and security, such as privacy extensions and a variety of address configuration methods, it also introduces new security challenges. Risks such as device tracking, spoofing, and various types of network attacks must be diligently addressed. So, disabling it might be a temporary measure to mitigate certain vulnerabilities until they can be addressed properly.
Pros and Cons of Disabling IPv6 on Mac OS
Disabling IPv6 on your Mac OS X device will have some benefits and drawbacks, depending on your situation.
- Resolves IPv4-only network compatibility issues.
- Simplifies network configuration and diagnostics.
- Potentially improves IPv4 network performance.
- Reduces dual-stack network management complexity.
- Minimizes security exposure to IPv6-specific vulnerabilities.
- Not a future-proof approach; IPv6 adoption is increasing.
- Loses IPv6's enhanced security features.
- Forgoes extensive IPv6 address space benefits.
- May block access to IPv6-optimized services and websites.
- Can cause issues if IPv6 is network-required.
The Bottom Line
In this article, we have shown you how to disable IPv6 on macOS in easy steps, using either the terminal or the network preferences. We hope that this article has helped you to solve your network issues and improve your internet experience.

Albert Ivan, writer by day, popper by night, is the former senior editor at iTop VPN. He Joined Falcon VPN in 2022 and has since written extensively on the topic of tech, digital privacy & security and internet freedom.
