If you want to change your location on Instagram either for personal or business purposes, look no further! In this article, we will walk you through the multiple methods of how to change location on Instagram. No skipped steps. Let’s dive right in.
Begin with Removing Previous Login Details (Very Important)
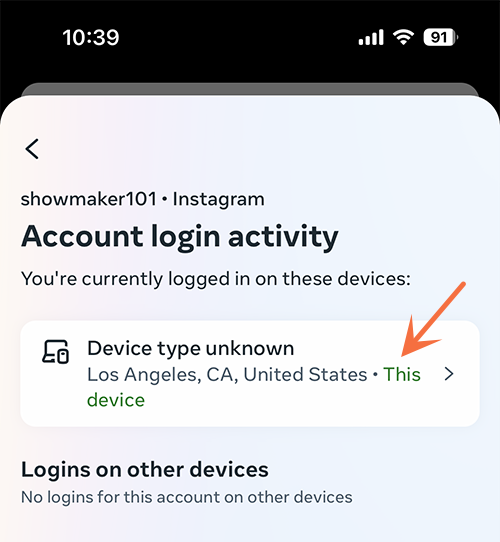
Before changing your location on Instagram, you should first remove your previous login details from your device. That’s because Instagram may associate your account with your previous location based on your login information. So if you don’t first take this step, you may not be able to change Instagram location successfully. That’s one of the key reasons why so many people still get stuck in their old locations. No to worry. It’s pretty simple to remove your login information. Just take the following steps:
Step 1. Open your Instagram app and then tap the profile icon at the bottom right corner.
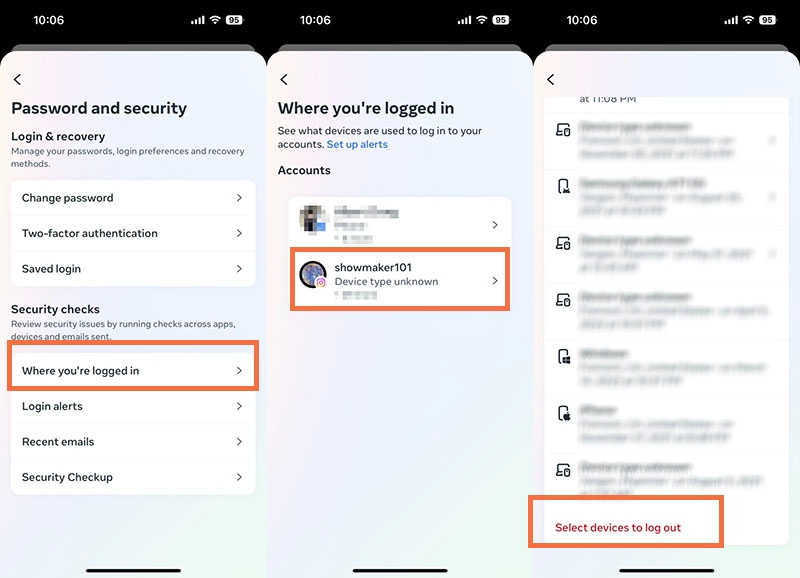
Step 2. Next, tap the menu icon at the top right corner > Tap on Settings (on Android) or Settings and privacy (on iPhone) > Go to Account Center tab > Click on Password and security.
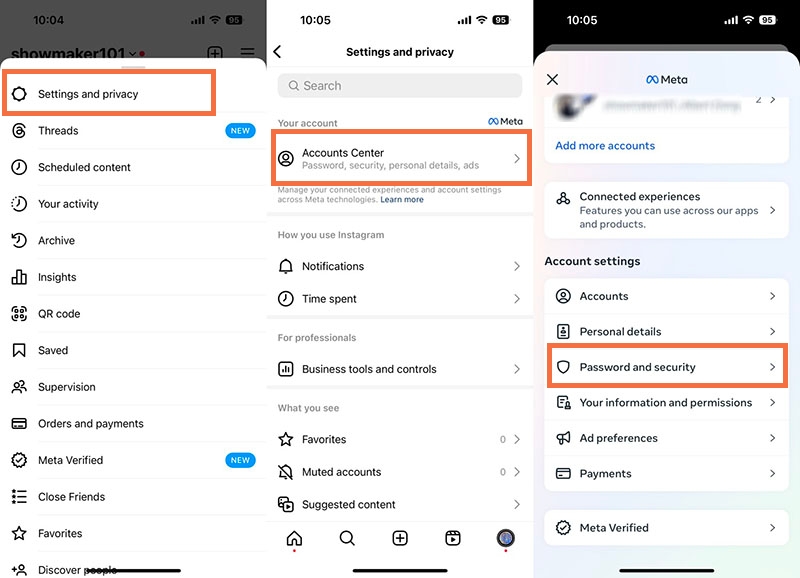
Step 3. Then, head to Where you’re logged in tab. Now, you can see what devices are used to log in to your accounts. Tap on your Instagram username > scroll down to the bottom and tap on Select devices to log out > Select all > click on Log out to remove all of the login details. You’re done.
How to Change Location on Instagram (iPhone)
After removing your login details, you will have 2 methods to change your Instagram location on your iPhone.
Method 1: Let Instagram process your location automatically.
If you’ve moved to another country/region and you would like to change your account country to there so that you can unblock some features that not available in your previous country or reach audience in your current region, you can reopen your Instagram app and log in. Make sure you’ve allowed Instagram to track your location with Precise Location turn on. Instagram will do it automatically recognize your new location.
To do this, you just need to take a few steps:
Step 1. Launch the Settings app on your iPhone.
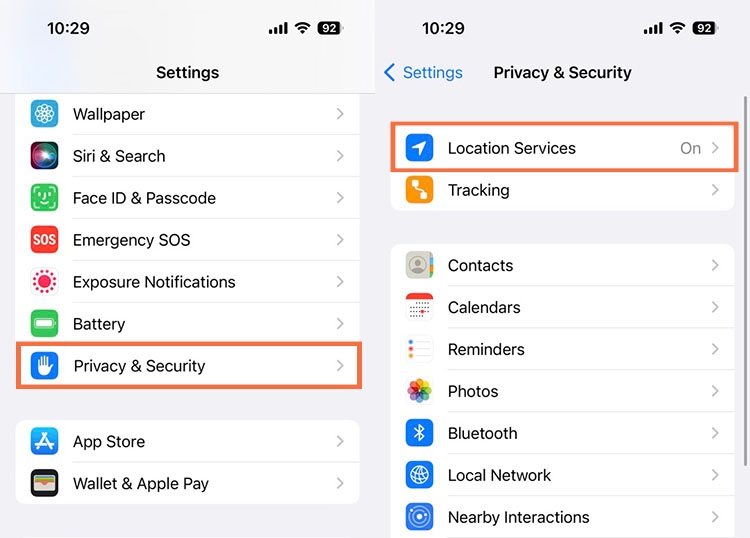
Step 2. Make sure you’ve turned on your location service. To do this, tap on Privacy & Security > Turn on Location Services.
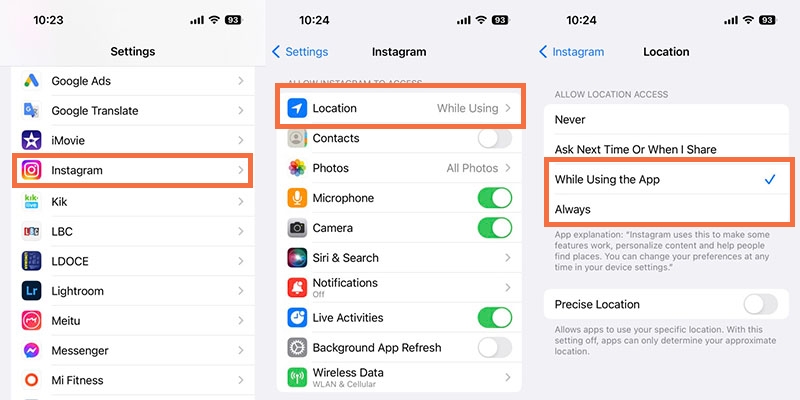
Step 3. Find Instagram > Tap on Location > Select While Using the App or Always.
Method 2: Change your virtual location with a VPN.
Quite the contrary. If you just go for traveling or move to another place for a while or run a business that targets audience from other countries and you don’t want Instagram to see you in the country you're actually in, you should set up a virtual location that makes you appear that you’ve in your previous location or in another region.
One of the easiest ways to change your virtual location is to use a VPN service. Since Instagram tracks your location via your data/Wi-Fi and GPS details which reveals your IP address and physical location, using a VPN can create a secure and encrypted connection between your device and a server in another country.
To use a VPN to change your account location on Instagram, you can take the following steps:
Step 1. Download and install a VPN app on your iPhone.
Yeah, there are many VPN apps available on the App Store, but we recommend NordVPN for its fast speed, high security and huge server feet. If you don’t want to pay for a VPN for a single location spoofing, you can also tap into a free VPN like Falcon VPN, which offers a host of servers worldwide yet decent speed and security protection.
StepDownload
Step 2. Launch the Instagram VPN that you’ve chosen. Here we take Falcon VPN as an example.
Step 3. Connect to a server by country or city where you want to be located.
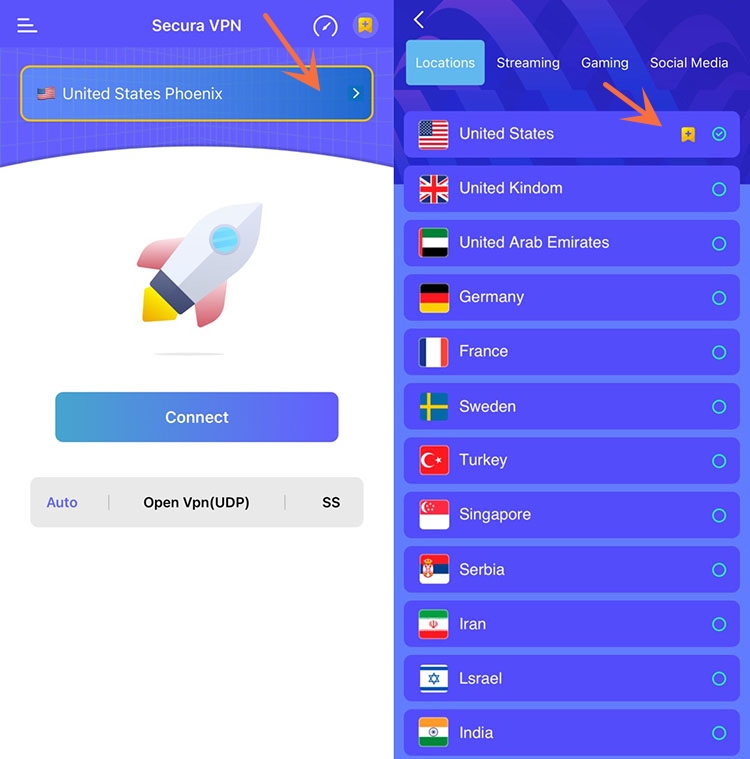
Step 4. Make sure you’ve cleared all your previous login details. Then open your Instagram app and log in with the VPN turned on. Instagram will process your new location.
How to Change Location on Instagram (Android)
Method 1: Let Instagram Recognize your new location automatically.
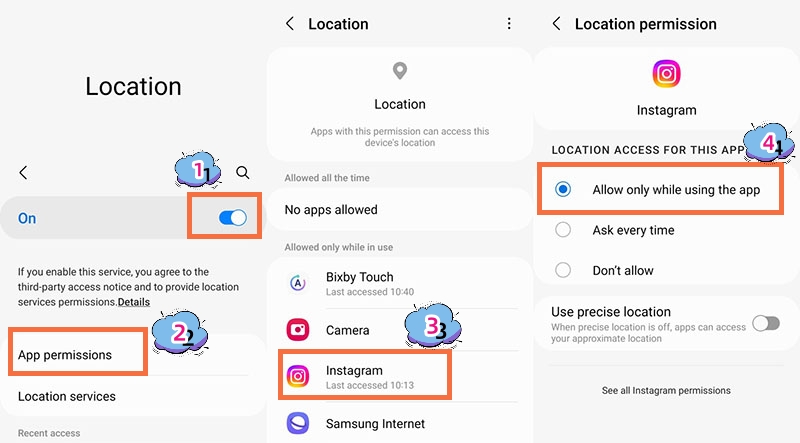
As mentioned in the last part, if you’ve moved to a new country or region and you want Instagram to see where you’re now. You just need to allow Instagram to access your location. You can let Instagram track your location on Android within a few steps.
Step 1. Open the Settings app on your Android phone.
Step 2. Scroll down the screen to find the Location tab.
Step 3. Enable location service > Tap on App permission > Select Instagram > Select Allow only while using the app.
Method 2: Utilize Surfshark VPN’s GPS spoofing feature.
Similar to iPhone users, if you don’t want Instagram to see your real location, you can also use a VPN service to make your account based in another country on your Android device. However, there is another option that you can try: using Surfshark VPN’s unique GPS spoofing feature. This feature is now only available for Android. It allows you to change not only your IP address but also your GPS location. That way, you can fool Instagram into thinking that you are in another country without changing your Wi-Fi or mobile network.To use this feature to change Instagram region on Android, follow these steps:
Step 1. Download and install Surfshark VPN app on your Android device from the Google Play Store or the official website.
Step 2. Open the app and sign in with your account. If you don’t have an account, you can create one within the app or on their website.
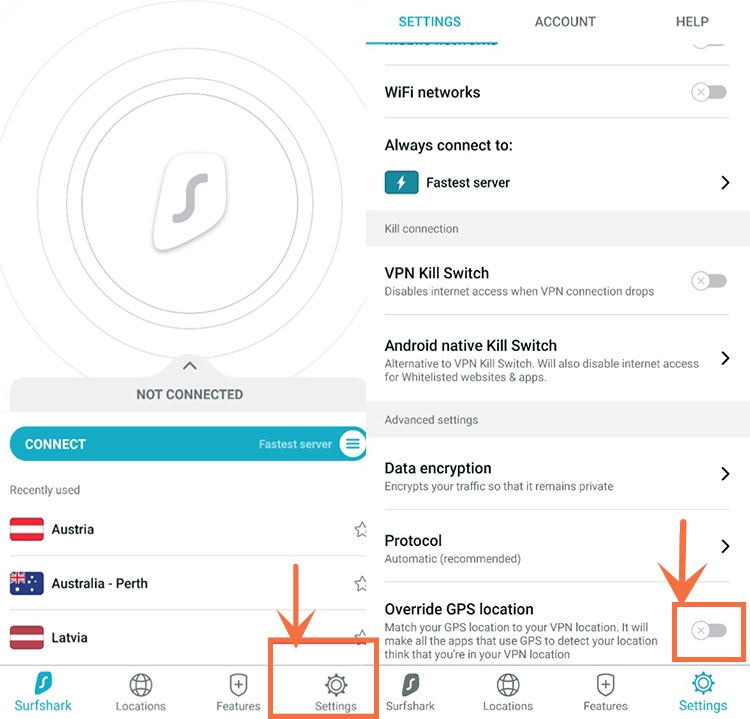
Step 3. Head to the GPS spoofing feature in the advanced settings in the Surfshark app. Enable it by tuning on Override GPS location.
Step 4. Go to the About phone settings tab on your Android. Find the Build number, and continuously tap it a few times. That will enable the developer mode.
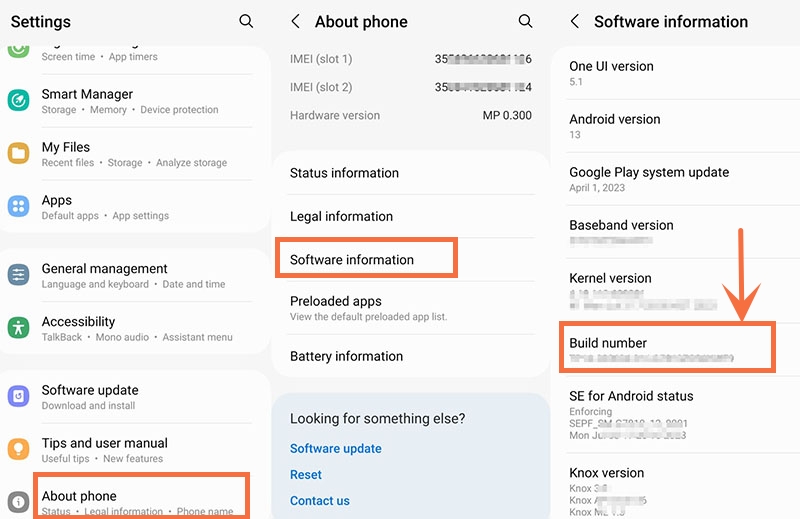
Step 5. Click on Select mock location app and choose Surfshark from the list.
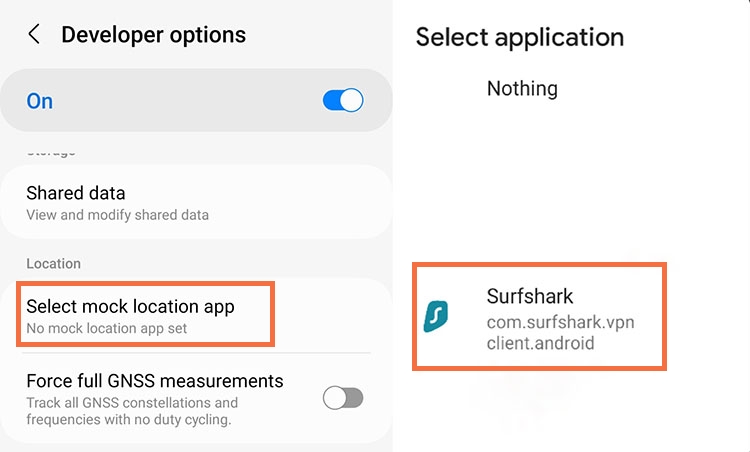
Step 6. Go back to the app and select a server location and connect to it. Then open the Instagram app. You should see that your location has changed to the country that you’ve selected.
Change Primary Country/Region on Instagram without VPN
Using a VPN service is surely a convenient and effective way to change your location on Instagram. However, you may not want to use a VPN service for various reasons. Don’t worry. There are other ways to change your location on Instagram without using a VPN.
Here are some methods that you can try out:
Method 1: Go to Instagram in-app support.
This is an official way to change your location on Instagram. You can contact Instagram’s in-app support and request them to change your location manually. This method may take a couple of days and may not work for everyone, but it is worth a try.
To contact Instagram’s support team, follow these steps:
Step 1. Open the Instagram app and tap on your profile icon at the bottom right corner.
Step 2. Tap on the menu icon at the top right corner and select Settings and privacy. Then scroll down to the bottom of the screen. Head to the help tab.
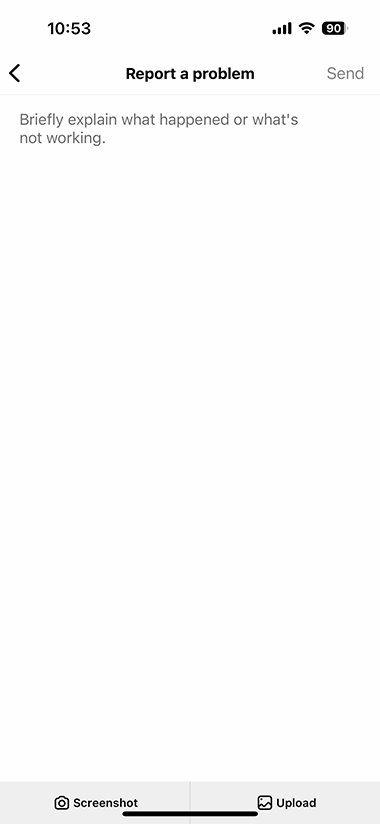
Step 3. Click on Report a Problem > Report problem without shaking > Don’t include and continue > Then write a message saying that “My Instagram account based in wrong county” or “My location is incorrect” and you’d like to change it. Be specific and brief in your message and provide your account details with screenshots or images to prove it. > Tap on Send and wait patiently.
If it’s been fixed, you will receive a notification saying “Your location has been successfully changed to xxx”. Good Luck!
Method 2: Tap into a location changer alternatively.
Another way is by using a location changer app that allows you to change your GPS location on your device without jailbreaking or rooting your phone. With it, you can easily hide your real location and make you seem like you’re in other regions. Here we recommend iMyFone AnyTo, a powerful and easy-to-use location changer app that works seamlessly with both iOS and Android devices. You can use it to change your location to anywhere in the world with just one click.
Here is how to use it:
Step 1. Download and install iMyFone AnyTo Software on your computer.
Step 2. Connect your mobile device to your computer with a USB cable and launch the iMyFone AnyTo app.
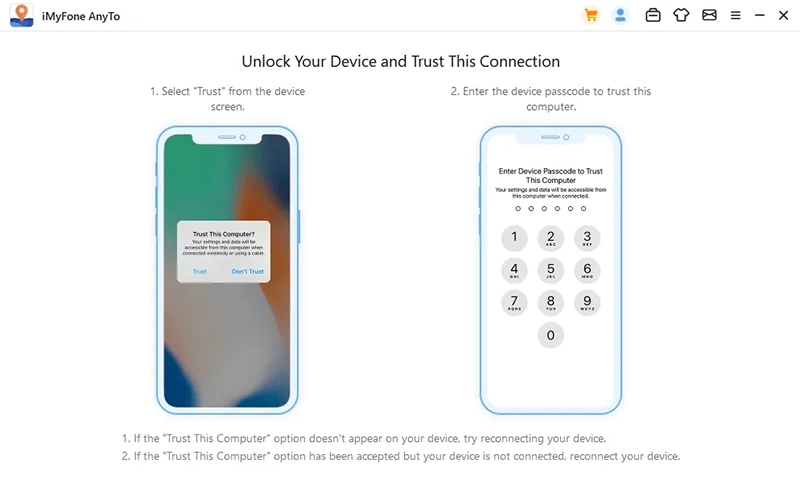
Step 3. Select Teleport Mode from the top right corner of the app and enter the name or address of the place that you want to change your location to in the search box.
Step 4. Adjust the pin on the map to fine-tune your location and click on Move.
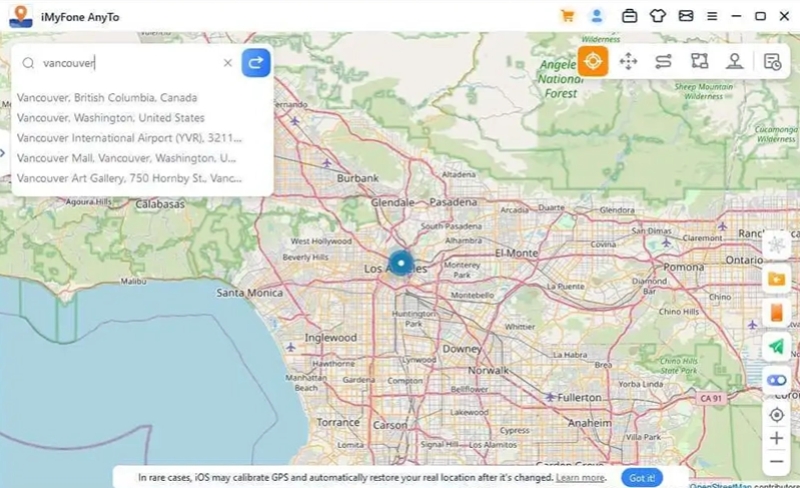
Step 5. Wait for iMyFone AnyTo to change your location on your device and then make sure you’ve removed the previous login details. All these done. Open the Instagram app and login.
Method 3: Switch to a Professional (Business) Account
The last method that we will show you is to switch your Instagram account to a professional (business) account. By switching to a professional account, you can set your location on Instagram based on your real marketplace and target country. You can also connect your Instagram account to your Facebook business page and make sure that your locations are consistent across both platforms.
To change location on your Instagram bio or business profile, you can follow these steps:
Step 1. Open the Instagram app on your device and tap on your profile icon at the bottom right corner.
Step 2. Tap on the menu icon at the top right corner and select Settings or Settings and privacy. Then tap on Account type and payments and then tap on Switch to Professional Account.
Step 3. Follow the instructions on the screen to choose a business category, connect to a Facebook page, review your contact information, etc.
Step 4. Once you have switched to a professional account, go back to your profile page and tap on Edit Profile.
Step 5. Tap on Contact Options and then tap on Business Address. Enter or edit your business address and make sure that it matches the country that you want to change your location to.
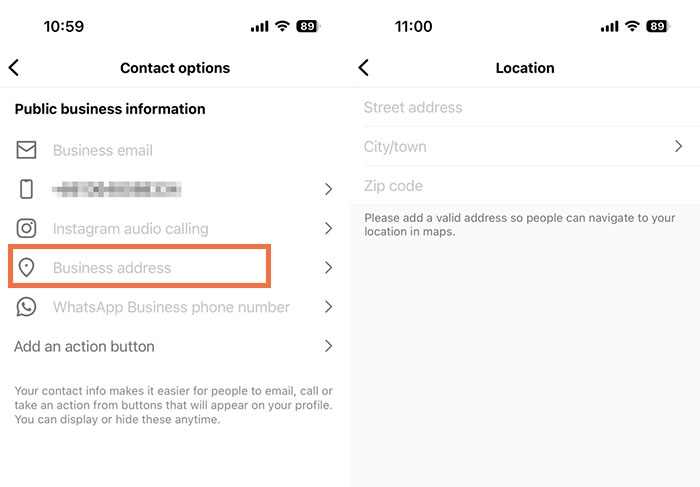
Step 6. Save your changes and then open the Instagram app again. You will see your location has changed to the country on your bio.
Troubleshooting After Changing Location on Instagram
While all of these methods shown above are useful and helpful, they are not entirely guaranteed to be 100% working. If you find that your location seems to be changed unsuccessfully, try these below:
- Use a new phone without a SIM card inserted first and log in to your account with a VPN or location changer turned on.
- Uninstall your Instagram app and change your app store country. Then download the Instagram app from your target country’s app store.
- Use a local SIM card from a target country to download the IG app. Make sure you’re using data instead of Wi-Fi when you are downloading and installing it.
- Clear the cache on your Android phone or on your iPhone and reinstall the app.
- Ultimately, create a separate Instagram account using a local phone number and email address. Then use a VPN or location changer to log into your new account.
FAQs
Why do I need to change my location on Instagram?
There are many reasons why you may want to change your location on Instagram. Here are the key reasons.
- Access features that are only available in certain countries like Instagram Music.
- Reach or target audience from another region or market for personal or business purposes.
- Build a robust following in that location, increase visibility and expand reach.
- Generate local leads. boost sales promotion and sponsored opportunities.
How do I change my location on Instagram stories?
You can change your location on Instagram stories by adding a location sticker to your story. Just follow these steps:
- Open the Instagram app on your device and swipe right from the home screen to open the camera.
- Take a photo or video or select one from your gallery.
- Press the sticker icon at the top of the screen and select the location sticker.
- Search for a location that you want to change and select it from the list. You can also tap on the current location at the bottom of the list to see more nearby places.
- Adjust the size and position of the sticker on your story and tap on Done. You can also add other stickers, filters, text, etc. to your story as you like.
- Tap on Send To and select Your Story or Close Friends to share your story with your followers or a specific group of people.
How to change the location of an existing Instagram post?
You can change it with pretty simple steps:
- Tap on the photo or video that you want to edit.
- Tap the three-dot icon in the top right corner of your screen. Then click on Edit.
- Tap the location name. You will be given options ➡ Remove Location or Change Location (iPhone), or Search for a location or Pick a location suggested by Instagram (Android).
- Tap Done (iPhone) or Tick mark (Android) to save your changes.
The Bottom Line
Changing your location on Instagram can be useful for various purposes, such as accessing more features, bypassing social media blocks, or reaching a diverse audience. In this article, we have shown you how to change location on Instagram on iPhone and Android devices, with or without using a VPN service. We hope that this article has helped you figure out how to change your location on Instagram easily and effectively.

Albert Ivan, writer by day, popper by night, is the former senior editor at iTop VPN. He Joined Falcon VPN in 2022 and has since written extensively on the topic of tech, digital privacy & security and internet freedom.
![How to Change Country on Amazon Prime Video [Simplified]](https://api.fastblognow.com/media/article_resource/How_to_Change_Country_on_Amazon_Prime_Video_ml9IrGF.png)
